29.6.13

FLORA MORNINGS: FINALE


For our final class, we were asked to look for a unique vessel to arrange flowers in. I found this antique vase at a Vinnies in Kiama for $10. Slightly on the expensive side for Vinnies, but I love it so much that I don't even care! I actually thought of using an antique trophy, but this turned out to be a better choice because I could fit many more flowers and foliage to create a large, lush arrangement.


I was hoping and praying that we would have some kind of vine or fern this week, and we did! Aspargus Plumosus, the answer to my prayers. From my extensive Google research (ha), it is also known as the Common Asparagus Fern, Lace Fern, Climbing Asparagus or Ferny Asparagus. Apparently it isn't actually a true fern, but who cares! It definitely looks like one and was perfect for my arrangement. It added a whimsical and wild feel, which I absolutely adore.


My final arrangement for this series. 

I am definitely happy with the shape, and how I was able to bring together the all skills I have learnt and use it today. From the first class, I used the technique of alternating flowers and foliage, to break up the colour and avoid having an arrangement which is too busy. I used the vase arrangement techniques from the second class. I learned my mistake from class three, where I had empty spaces in between the flowers, making my arrangement look very haphazard. And from the fourth class, I learned how to embrace bright colours and how to make them compliment each other.

Even though the colours of the flowers aren't the muted pastel tones I prefer, I think I made the most of it! I'm glad I chose an odd shaped vase for the final class, so that I could get lots of tips from my teacher. So here we come to the end of the Flora Morning Series. If you've persisted reading this far, thank you so much! I really hope you've enjoyed it as much as I have.

22.6.13

FLORA MORNINGS: PART 4

My wish for there to be roses this week came true! 
And such beautiful roses they are. I could honestly stare at them all day...


We were really spoilt for choice this week with our flowers, as we even had lisianthus! They are one of my favourite flowers and are quite commonly found in wedding bouquets. The little purple chrysanthemums were so cute and vibrant with their bright green centres.


These sea hollies were so unique! 
I loved how well they complimented the bright green chrysanthemums. 


Look at the selection of flowers we had this week! So dreamy... We had so many types of flowers I didn't even use all of them up. So I brought the leftovers home to play around with. In this photo you can see that we had some tetragona nuts which look like the eucalyptus gum nuts I used a few weeks back. The big shiny green leaves are camelias.


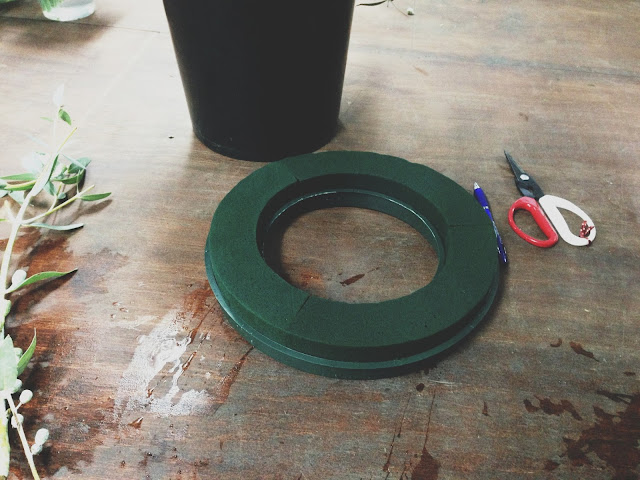
So on to the first arrangement - a wreath! SO excited about this arrangement as I've always wanted to learn how to make a wreath. Instead of making a hanging wreath, we made a table centrepiece. The flowers were placed at a lower height, so as not to block the flow of conversation. Below you will see floral foam in the shape of a wreath. We placed the flowers in the foam on an angle, flowing in the same direction to ensure continuity. 


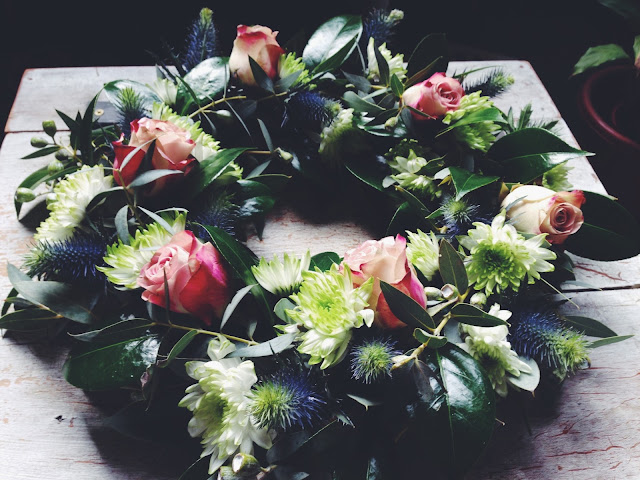
The foliage I used to create the base of the wreath were the tegragona nuts, which did a perfect job of hiding most of the floral foam. After I placed the base foliage, I started placing the flowers. I decided to go with small clusters of 3 different flowers - one rose, one chrysanthemum and one sea holly. I then used the camelias to hide all the exposed floral foam, which also did a good job of bringing the whole wreath together by making it look more dense and uniform. As we had such a large range of flowers to play around with this week, it was interesting to see everyone else's arrangements as you could clearly see all the different styles. I wish I could've taken photos of all the arrangements!


A close up of the wreath...


We also made Pomanders. To create a Pomander, we used a small floral foam ball. This arrangement was really difficult to handle as you had to constantly hold the ball in one hand by the wire or risk squashing all the flowers on one side. You then had only one hand to cut and prepare all the flowers (usually a two handed task). Single-handed floristry is what I call it... I'm pretty sure I will have a sore arm again! For this arrangement I used the lisianthus, purple & bright green chrysanthemums, ivy and spray roses. 


A close up... 


Bottom view of the Pomander.


I have to say this was one of my favourite classes as we made such unique arrangements and had such an amazing range of flowers. I only hope next week is just as good! Yes, it will be the last class... I am so sad thinking about it but all good things must come to an end! I plan on purchasing some books by Constance Spry for some floral inspiration! More on that in another post......

19.6.13

FLORA MORNINGS: PART 3

If there was a theme for last Saturday's Flora Morning class, it was definitely tropical. This came as a surprise because it is definitely very chilly and wintery in Sydney at the moment! Tropical flowers and experimental arrangements aren't really my style, so this week was quite a challenge for me. Nonetheless it was still fun to play around with the flowers and was a good experience for me to get out of my comfort zone. 


We got a chance to use floral foam this week. It's quite amazing how heavy the foam becomes after it's been soaked in water. Being an amateur florist, I can't always get the flowers to stay in the position I want them to be in. With floral foam, the flowers stay right where I place them! 


Another new thing I got to do this week was to create a floral arrangement in a husk. Very experimental and like I said before, completely not my style. Still, it was interesting to know that similar techniques can be adapted and used with different flowers and containers. 


Here I have prepared the floral foam by wrapping the bottom with cellophane, so that the water does not seep into the husk and make it soft. 


The next step was to place the Anthurium leaves at the lowest level of the floral foam, to help hide the floral foam. I really should have taken pictures of how I arranged each group & layer of flowers, but I guess I got carried away! 


And here it is! The front of the arrangement. The focal point of the arrangement is definitely the Heliconias. Here I have used 1 larger Heliconia with 2 smaller Heliconias to create this fan shape. Right next to the Heliconias you can just barely see some small balls of Dianthus Trixies. They were my favourite flowers to work with this week! Such cute little green balls that are so interesting. 


This is the back view of the arrangement which features 2 Anthurium flowers. 


I hope you enjoyed my tropical post this week. Looking forward to this Saturday's class. Hoping that there will be some roses or even peonies or dahlias, although I highly doubt it because it isn't the season for them... We have all been asked to look for unique vessels in which we would like to arrange flowers in, as during the last class we will have the opportunity to arrange flowers in the vessel of our choice! I have purchased a beautiful vintage vase, but I have yet to take a good photo of it. Photos to come in the next post!

1.6.13

FLORA MORNINGS: PART TWO

The flower list for this morning's class. Chalkboards are so beautiful! I also love my teacher's handwriting. Watching her write is so mesmerising. And don't get me started on her arrangement demonstrations! Everyone pretty much watches with mouths gaping in a trance-like state, until she says, "Okay, now you have a go!" 


Flowers prepared and waiting to be arranged...


...into a vase! 


Today we learned how to do 3 types of arrangements... The first was a hand tied vase arrangement,  which means you arrange the flowers in a spiral pattern in your hand, then place it in the vase. For this arrangement, the flowers were evenly spread throughout the arrangement. Sadly, after we did this arrangement we had to undo it as we had to reuse the flowers for the next arrangement! 


This was the second hand tied vase arrangement. To give the arrangement a more dense look, flowers of the same kind were placed in bunches of 3 stems, with foliage placed in between each type of flower to break it up. From this picture, the arrangement looks kind of uneven and lacking in colour... But really it's because the lilies have yet to bloom! Similar to the arrangement before, this was undone to create our final arrangement which we got to bring home.


Finally, the third arrangement which was actually placed in the vase and not disassembled! It was funny how every one got so upset that they had to undo their arrangements... I guess it's because hand tied arrangements are quite a feat! They require a lot of hand and arm strength, as the flowers tend to get quite heavy and your grip has to be fairly strong. A few of us even got palm cramps from gripping the flowers too tight! Time to get one of these. So, onto the last arrangement... As we are a class of amateur florists, we were advised to use sticky tape to help hold our flowers in place. This meant sticking two pieces of sticky tape across the mouth of the vase in an 'X'. The tape helps hold the flowers and foliage in place, which is a great tip for budding florists (haha, punny!). 


Feeling sad that there isn't class next week as it is the long weekend... I guess it also means that the dreaded end of my classes is postponed? Not quite sure what I will do with myself after the classes are over. They make me so happy & really inspire me! Perhaps I will host a Flower Potluck just like Kinfolk did. That would be nice! In the meantime, Happy First Day of Winter! I will leave you with a picture of some pretty autumn leaves and my cold shivering feet. Note to self: Get boots!

25.5.13

FLORA MORNINGS: PART ONE

I attended the first of five floristry classes at Pearsons School of Floristry this morning. As a result of my non-stop gushing over flowers and day dreams about being a florist, D decided that this course would be the perfect birthday present for me - which it is! However, it has been such a challenge to find five free Saturdays in a row, due to all the weddings that have been happening. But as winter approached, my Saturdays were gradually freed up. 

Eucalyptus gum nuts & Eucalyptus dollar gum

Tools of the trade. 
I'm excited about receiving my very own pair of florist scissors next week!

Brigitte, my teacher, and fellow florist-wannabes.

Brigitte's table

How to construct a flat back hand-tied bouquet.

A tussie-mussie. Also known as a nosegay or posy. 
To be placed on the dinner plate & is also a gift for your guest.

My Sing-stralian bouquet. 
It has Dendrobrium Orchids, Eucalyptus gum nuts and Eucalyptus dollar gum. 
The Orchid is Singapore's national flower, and the Eucalyptus is a native Australian plant.

This bouquet has Chrysanthemums, Lilium Asiatic (Lilies), Roses, Biburnum, Corclyline and Monsterea.
Assembling this hand-tied bouquet was quite challenging. I'm pretty sure my arm is going to be very sore tomorrow! 

The class was so inspiring and I loved every minute of it! I am usually a highly competitive person, constantly checking out what the next person is doing and trying to beat them at it. Or I try to be the first to finish the task at hand. However during this class I found myself completely submerged in my own work, taking my time so that each stem was perfectly placed. I was completely in awe of how swiftly Brigitte selected and trimmed each stem, then placed it in the most complimentary way. I cannot wait for next Saturday morning!

5.5.13

UNWIND


I ended up going with option 1, because when I went back to Morris & Sons I realised the colours in the photo I posted came out more saturated. So I spent another few hours in the shop mulling over which combination I would go with, and decided on number 1. (I apologise if I have upset anyone with my decision!) I've posted a photo of the first 3 triangles I've made for this new throw, and guess what - the colours didn't turn out again! Here it looks like mustard, navy and red when in true fact it's more of a lime green, a purpley-blue and magenta. The names of the yarn are Limelight, Storm and Petunia. I wonder who gets the wonderful job of naming yarns... I wouldn't mind that job one bit! 

On Saturday, D and I went for brunch at The Commons. Going for brunch happens once in a blue moon, because he doesn't particularly like breakfast foods, or drinking coffee out of home (what!?). I on the other hand, love breakfast foods and coffee (especially at cafés), so this was a nice little treat for me! The Commons is such a pretty place, which is a café during the day and turns into a restaurant/bar at night. It's full of plants, wooden tables and chairs, filtered sunlight and even has a fireplace. So very dreamy.


27.4.13

WINTER IS COMING

I've been on an unplanned hiatus simply because it has been summer when the sun is out from behind the clouds, days are long, the beach calls my name and it has simply been too hot and sticky to think about crochet (or sitting still, for that matter). However now summer is now gone for another year, and (because I am obsessed with Game of Thrones) winter is coming... But not just yet, as Sydney is in the midst of one of it's most pleasant autumns for as long as I can remember! Autumn is when sun baking on my couch is possible, and when I begin covering my shoulders with cardigans or throws in the evenings. Speaking of throws... I have finally finished the granny square throw I began last winter! 


Voila! Here is Inuka (my polar bear plush from Singapore Zoo) with my very uneven and puffy granny square throw which I have bittersweet feelings about. I am excited and overjoyed that I have finished the first ever crochet project I started! The mint yarn was bought at the Camberwell Markets in Melbourne when I was preparing for my crochet class. The same crochet class where I learned to read my first crochet pattern - the granny square. However I am unsatisfied with the lack of uniformity of the granny squares, which contributed to the unevenness and puffiness of the throw. I also am remorseful over the chosen sequence of the squares as some patches have too many dark colours neighbouring each other. And the colour! The colour is one of the bigger disappointments... I chose these colours with D in mind, as I wanted the throw to be gender neutral. Some colours were pastel and some were solid, which made the throw look very haphazard. Anyhow, I think over the past few days I have begun to embrace all these mistakes I have made and have come to love this imperfect throw. The different sizes of the granny squares show how I was refining my crochet skills over time and the mismatched colours just emphasises how overwhelmed I was when I made my first purchase at Morris & Sons

Another year, another throw... For 2013 I am planning to crochet a throw not made up of granny squares, but granny triangles! I toyed around with the idea of hexagons, but decided on triangles in the end because of these beautiful throws. To avoid another colour mistake, I spent too many hours pacing around Morris & Sons um-ing and ah-ing over colours. In the end I decided to run a poll on Facebook and Instagram on which colour combination I should choose. 


I got an overwhelming response! At the moment it is a tie between 2 and 3. I may end up going with 2, just because the yarn is cheaper. I did my calculations and I am going to need 18 balls of yarn! With each ball of yarn costing between $6 to $8, I may have to decide on the cheaper (and itchier) option. Who would've though wool would be cheaper than cotton... 

Hopefully this throw won't take as long as my first throw to complete as I am faster and more skilled in the art of crochet! It has almost been a year since I picked up crochet and I am so glad I did it. I promise to update this blog more often and will post up pictures of this throw's progression! Thanks for reading!